Friday, November 27, 2009

Luck Has Nothing To Do With It

Following my recce shoot of the Smith Gallery, I went back to create the shot I had in mind, this time all in camera, no photoshop/HDR-buggery. Just so you have an idea of the challenge involved, here's a picture exposed just for the beautiful ceiling:

OSM Smith Room No flash

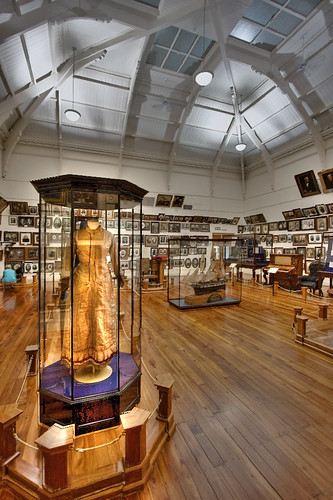
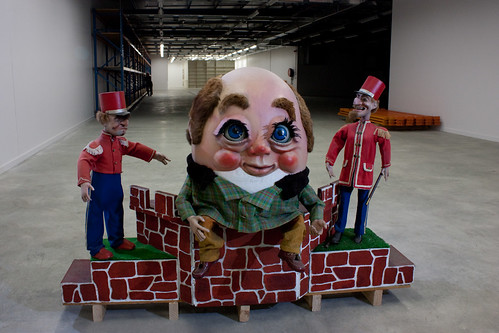
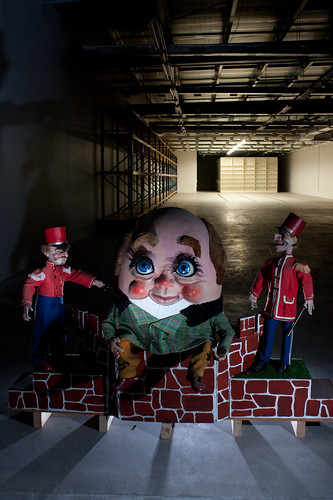
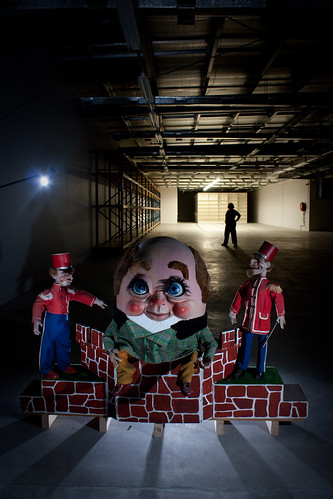
Lovely up there, but it's the only light source in the room, and the height means the light falloff makes for dingy walls and floor lower down. The job called for several lights, carefully placed to avoid hot spots, shadows and reflections. I wanted the dress in the foreground to be a focus for the shot, but bare flash just didn't do it any justice, so I warmed it up with CTO and Yellow gels, and a little fill from the floor. Strobist details are on the flickr page if you're interested. Anyway, five flash guns, two radio triggers, three optical triggers, three light stands, one tripod and a wireless camera remote in play, and this was the final result:

OSM Smith Room-4

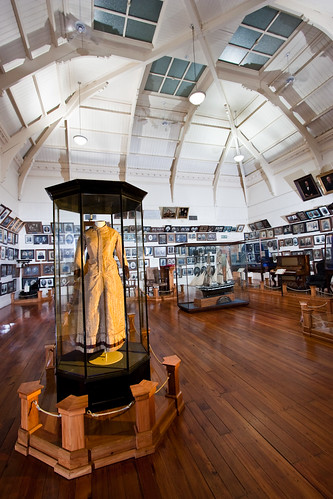
I'm happy with this. I could have done it faster. With a litte more faffing around and perhaps some more equipment, I might have been able to do something a little subtler with the walls, but once upon a time I wouldn't have had a clue how to do any of this. The only thing I miss is the lovely violet colour of the base the mannequin was on, but that was a bit of a photoshop artefact anyway. I'm glad I did the recce shoot to create what I wanted with Photoshop and come up with a plan on how to achieve it, but I'm fairly confident that I could probably have pulled this off straight away anyway. That's growth, and I must give due thanks to David Hobby and his Strobist blog for all the great lessons.

Thursday, November 26, 2009

Wide Open Spaces (and wide closed ones)

There's nothing like a paying gig to justify some expensive gear. I've been wanting the Canon 10-22mm EF-S 3.5-4.5 lens for some time now, and finally stumped up the cash for one last week.

I've been pretty pleased with my EF-S 18-55mm lens, but this baby just gets more in the picture, which is particularly useful for the shots I'm doing for the Otago Settlers Museum. Some of the galleries are magnificent spaces, and it takes a really wide angle of view to portray that.

Smith Gallery 5

I love what it let me do with this recce shot of the Smith Gallery, showing pretty much of the room and that cool vaulted ceiling. To be honest, this shot wasn't totally achieved in camera. It is one single frame, but the wide exposure range meant I had to combine separate exposures for the ceiling, walls and floor and create a High Dynamic Range picture with the Photomatix application. I also dodged the foreground dress in a little to brighten it up.

I plan to go back soon and achieve this look by lighting the place. A tricky job, but I love the challenges assignments like this present. The new lens also let me tackle some exterior shots of the museum. It's housed in two long historic buildings that come together in an angle. Close up, it's hard to fit it all into one shot and if you get back further, you have to contend with busy traffic and lots of difficult foreground clutter like large trees and lamp posts.

OSM exterior

The lens is nice and sharp, and I really like the colour response. I was worried about shooting blue skies without a CPL filter to darken the blues, but I like what I got here - although to be honest, I like to saturate my colours a lot in post. Just a personal preference.

OSM entrance 1

This final shot is pretty juiced. Fill light, saturation and clarity adjustments in Lightroom, followed by lens distortion adjustments in Photoshop. Again, the dynamic range of the natural light forced me to lighten the shadows in post. It's kinda cartoon-graphic like, but I sort of like it anyway. Like I said, I love what this new lens lets me do.

OSM entrance 2

It's not about expensive gear but boy, does it help sometimes.

Tuesday, November 17, 2009

More Ink

Dr Know

Some of my work has just appeared in the science section of the Sunday Star Times. It's the story of Dr. Paul Trotman's documentery Donated To Science. They used a portrait I shot of Paul at home in a section banner and one of the shots I took during filming in the dissection room. You can check out the online version here. My previous posts on shooting with Paul are here and here.

Most important of all, you should tune in or set your recorder to catch Paul's film. It was shot by the very talented Stephen Downes. For a documentary about cutting up dead people, it's beautiful. TV3, 9.30 pm Wednesday 18 November (that's tomorrow, for the chronologically challenged).

Friday, November 13, 2009

Pixietown Gothic

I always knew that if I hung around Museums for long enough, something interesting would happen. On the strength of my Gasworks Museum pictures, I recently picked up a little work shooting promotional material for the Otago Settlers Museum.

The first assignment was to show the brand new storage area, which is going to be open for the public to explore this weekend. My first thought was to try for a long perspective shot, showing rows of shelves stacked with miscellaneous exotica, something reminiscent of the closing scene from the first Indiana Jones movie. But then my eyes settled on Humpty.

Humpty

Humpty and friends are part of the old Pixietown display. I've always found these things a little sinister myself. They're just a bit too lifelike for comfort and when the museum folks told me some of them had real human teeth, well that did it. I decided to try for something out of The Twilight Zone.

Humpty-6

It took a while to play around with the mix of flashes and room lighting, and Humpty kept threatening to run away with the picture. After all, the shot is supposed to be about the space, so with that in mind, I slowly built my picture up, flash by flash.

Humpty-5 Humpty-2

Humpty-4

My key was behind me and to the right. Some shots used a rim light behind Humpty and to the left - I even kept it in shot for a few frames. I like it, but think flash-in-shot is what HDR is to 2009, selective colour was to 2008, and what the starburst filter was to the 70's - stylish, but faddish. The soldier on the left needed a snooted flash all of his own, but the last addition really nailed it for me - a flash behind Humpty on the ground, setting up those rays of light on the floor.

Humpty-1-2

Looking back, I'd have snooted my key a little to keep it off the floor and help those light rays a little, and gelled the floor flash to match the ambient fluoro lighting at the back of the room. But the client's happy, and after this little job, so am I. There are several more exhibits and events to shoot for the museum, requiring different approaches, so stay tuned.

Monday, November 9, 2009

The Final Frontier

Space. Not the inky infinite, starry space. I'm talking the domestic variety. Rooms and stuff.

When a family member of mine decided to put her house on the market, I offered to shoot some interiors. A good realtor with a point-and shoot can do a fairly decent job these days, but I thought with a little practice, I might just be able to add a little sizzle and the chance to practice lighting spaces instead of just objects was a learning experience I couldn't resist.

Ensuite

It wasn't going to be hard. The property was designed by my dear departed father-in-law, and it's a cracker, built to make full use of the sun for light and passive solar heating, and with top quality fixtures and fittings. All I really needed to do was to add a little extra light in the dark corners, and where windows were in shot, try to balance the light with the ambient exterior. It's amazing what a difference a bit of extra directional light can make to a picture of a room.

Bedroom

Living Room


The first thing was to de-clutter the rooms a little, just clear the benches and shelf tops. Then it was a fairly simple matter of adding one, two or three flashes to create a nice even light, and help the colours pop a little. I went for a daylight look since we're going into summer, but it would have been easy to light the log burner and gel the flashes to get a warmer evening feel.

If you look carefully at the shadows, you can pretty well figure out where I had my flashes placed. I think my favourite shot is the kithen. I love that shiny stainless steel, and my rellies have pretty nice taste in colour.

Kitchen

It'll be sad to see the property leave the family, but if it gets a good price, I'll be happy. It's been a great first exercise in lighting spaces, and one I'm going to need for my next assignment. Now that's an exciting project. Check back soon.